Friday, December 14, 2012

Hurry Upp - Improve Alexa rating

1. Download Alexa Toolbar

The toolbar is quite useful to keep track of your sites ranking.

2. Write Blog Post about Alexa

Just like other networks, Alexa do love sites which posts content about it and let their users know the credibility and value they possess in current internet market. A post linking to them with a few words about their services and boom! Alexa will notice and make you go up the rank ladder a few steps.

3. Ask for reviews

If you ever had visited your Alexa site rank with concentration you must have seen that reviews tab? Yeah if it’s there, it must be helping their service to rank websites and positive reviews will surely do wonders for your rank. If you have a trusted user base you can ask your traffic to write reviews about your site or if you are new on the ladder, get some friends do it for you in start and leave rest for your audience.

4. Submit your blog to directories

Alexa tracks your back-links as well, so the more links you’ll have pointing your site either direct or deep it doesn’t matter much, you’ll get notice by them which will increase your web rank. This will also help your SEO campaign as Google also love and track links to the site and it helps them count your search engine rankings, but make sure the links are useful, originating from authentic sites with nice reputation and of the same niche as yours.

5. Place Alexa widgets:

Just like I pointed out earlier, the more you’ll love Alexa on your site the earlier you’ll climb up the rank ladder. So make sure you are having their widgets on your site or blog. If your site is under 100K you can also place the traffic stats widget as well which will surely look good in your site bar or footer if its widget ready or else go with the simple site rank widget at least.

6. Get more people to your site

More people = More Traffic and ultimately better rank. Sounds natural? So get some quality content on your blog and promote your blog or web which will ultimately bring you traffic and your rank will shoot as well.

9. Auto Traffic Exchange

Traffic Exchange programs bring a lot of traffic to your blog, although the quality isn’t much worthy and often it increase your bounce rate as well as the traffic is more interested in getting paid or to get the source they clicked for. So traffic exchange does work but comes with its cons too which you should keep in mind too while opting for it.

10. Offer guest post with quality content

I know a number of just started blogger who avoid linking to others, or allowing someone else to post on their blog, I too was like that in past, but remember in blogging you are dealing with the world wide web and you can never get attention of others while resting in isolation, you’ll have to make your own space and give some to others. So allow other bloggers to post on your blog, do the same and the results will be fruitful like nothing other but make sure that the content you post or ask other to publish is original and of worth. This will end with a boost to your Alexa rank certainly.

11. Leave comments on high ranking sites

You see that Sites Linking IN under the Reputation heading? It obviously matters and the more you have links to your site the more your alexa rank will climb and the more SE Juice you’ll get. Now how to get links? One of the easiest methods to get links is to check well ranked sites on Alexa and leave a nice comment there with a backlink to your site. Although the link will be “no-follow”, but it will certainly drive targeted traffic to your site.
Make sure what you left there is not a piece of junk which will be sooner or later removed by some moderator rather write what will build your reputation, motivate comment readers to check in and visit the link you left there.
You’ll lose a lot of traffic by just saying:
Hi! Nice article, please check my site at: www.some-xyz-website.com
Rather a nice article with a related link and brief introduction will surely help you gain user trust and they’ll visit your link for more in depth knowledge.

12. Frequency of posts

I tried it myself and get no real benefit, but it’s quite common community trend to ask new bloggers and authors to publish their content on a fixed time. This will help the crawler know when you publish your content and it will be already there to index your site as early as possible, also this will boost your rank and ultimately will increase your loyal readership who’ll actually then know when they’ll find some more interesting information on your site.
This technique is not applicable to a few niches including tech updates, news etc. as they have to break the news as earlier as possible and they can’t actually wait for their posting time to come. So make your decision keeping in view your niche demands.

13. Branding with your name on other sites (Gravtor)

Brand your site on other platforms with the help of a logo gravtor, this will give you a unique presence and will also increase your online reputation which ultimately leads to more traffic, more ranking.
Get famous = Get Online Presence = Get More Traffic = Get Nicer Ranks
Simple, isn’t it? So why not start acting then?

14. Social networks (Facebook/Twitter/ G+)

Search engines now a day crawl all these places to get some more information on who’s in trending now? Which site’s content is getting viral and doesn’t give a damn about all these places and just keep on seeding content on their site.
Make sure you use all these platforms to engage your readership and keep them busy with your latest content. Their likes, shares, retweets, +1s all will count to the big cause and will drive your more traffic and more rank.
And the last tip which is import of all:

15. “Remember, Content is KING”

The heading says it all, no more explanations.

Foot Note:

Did you know that the average person spends just 7 seconds on a resume?
The point is that people have short attention spans, and if you write in huge paragraphs, with no proper formatting, you’ll likely lose readers. After the 1,300th word, people’s eyes start glazing over, unless it’s superbly written. This post consists of 1297 words, so I am pretty much on track.

Monday, December 3, 2012

What is C#.NET Generics? where we can used in real time?

Generics were added to version 2.0 of the C# language and the common language runtime (CLR). Generics introduce to the .NET Framework the concept of type parameters, which make it possible to design classes and methods that defer the specification of one or more types until the class or method is declared and instantiated by client code. For example, by using a generic type parameter T you can write a single class that other client code can use without incurring the cost or risk of runtime casts or boxing operations, as shown here:

// Declare the generic class. public class GenericList { void Add(T input) { } } class TestGenericList { private class ExampleClass { } static void Main() { // Declare a list of type int. GenericList list1 = new GenericList(); // Declare a list of type string. GenericList list2 = new GenericList(); // Declare a list of type ExampleClass. GenericList list3 = new GenericList(); } }

Lacy Print PDF Document Pages by PDF Viewer with C#, VB.NET

Step1. Create a new project.

1.      Create a new project in Visual Studio. Please note that this project needs a Form.

2.      Set the Target Framework of This project to be .NET Framework 2 or above in Properties.

Step2. Add reference and Set up the Form.


1.      Add Spire.PDFViewer Form Dll as reference from your downloaded Spire.PDFViewer.

2.      Add a toolScript  and pdfDocumentViewer in the default Form " Form1".

3.      Add two buttons and a ComboBox  in Form1 from toolScript dropdown list

4.      Set the "Name", "Display Style", "Text" and "ToolTipText" of button1 in Properties to be "btnOpen", "Text", "Open" and "Open PDF document" and button2 to be "btnPrint", "Text","Print" and "Print PDF document".

5.      Set the Dock property of pdfDocumentViewer in order to view PDF file page in a enough space.
Step3. Print PDF Document Pages by PDF Viewer

1.      Add below namespaces at the top of the method.

C# Code:
using System.IO;
using Spire.PdfViewer.Forms;

VB.NET Code:
Imports System.IO
Imports Spire.PdfViewer.Forms
2.      Load a PDF document from system

C# Code:
        private void Form1_Load(object sender, EventArgs e)
        {
            string pdfDoc = @"D:\michelle\e-iceblue\Spire.PDFViewer\Demos\Data\Spire.Office.pdf";
            if (File.Exists(pdfDoc))
            {
                this.pdfDocumentViewer1.LoadFromFile(pdfDoc);
            }
        }

VB.NET Code:
         Private Sub Form1_Load(sender As Object, e As EventArgs)
         Dim pdfDoc As String = "D:\michelle\e-iceblue\Spire.PDFViewer\Demos\Data\Spire.Office.pdf"
                 If File.Exists(pdfDoc) Then
                     Me.pdfDocumentViewer1.LoadFromFile(pdfDoc)
                 End If
         End Sub
3.      Open the PDF document

C# Code:
        private void btnOpen_Click(object sender, EventArgs e)
        {
            OpenFileDialog dialog = new OpenFileDialog();
            dialog.Filter = "PDF document (*.pdf)|*.pdf";
            DialogResult result = dialog.ShowDialog();
            if (result == DialogResult.OK)
            {
                string pdfFile = dialog.FileName;
                this.pdfDocumentViewer1.LoadFromFile(pdfFile);
            }
        }
 
VB.NET Code:
         Private Sub btnOpen_Click(sender As Object, e As EventArgs)
                 Dim dialog As New OpenFileDialog()
                 dialog.Filter = "PDF document (*.pdf)|*.pdf"
                 Dim result As DialogResult = dialog.ShowDialog()
                  If result = DialogResult.OK Then
                 Dim pdfFile As String = dialog.FileName
                 Me.pdfDocumentViewer1.LoadFromFile(pdfFile)
                 End If
         End Sub
4.      Print PDF document pages by PDF Viewer

C# Code:
        private void btnPrint_Click(object sender, EventArgs e)
        {
            if (this.pdfDocumentViewer1.PageCount > 0)
            {
                this.pdfDocumentViewer1.Print();
            }
        }
        private void pdfDocumentViewer1_PdfLoaded(object sender, EventArgs args)
        {
            this.comBoxPages.Items.Clear();
            int totalPage = this.pdfDocumentViewer1.PageCount;
            for (int i = 1; i <= totalPage; i++)
            {
                this.comBoxPages.Items.Add(i.ToString());
            }
            this.comBoxPages.SelectedIndex = 0;
        }
        private void pdfDocumentViewer1_PageNumberChanged(object sender, EventArgs args)
        {
            if (this.comBoxPages.Items.Count <= 0)
                return;
            if (this.pdfDocumentViewer1.CurrentPageNumber != this.comBoxPages.SelectedIndex + 1)
            {
                this.comBoxPages.SelectedIndex = this.pdfDocumentViewer1.CurrentPageNumber - 1;
            }
        }
        private void comBoxPages_SelectedIndexChanged(object sender, EventArgs e)
        {
            int soucePage = this.pdfDocumentViewer1.CurrentPageNumber;
            int targetPage = this.comBoxPages.SelectedIndex + 1;
            if (soucePage != targetPage)
            {
                this.pdfDocumentViewer1.GoToPage(targetPage);
            }
        }

Client side file size validation using javascript


uploading file in rad Asynchronous upload and validating file size using java script or validating uploaded file size from client side

Here in this article i am going to explain how to make validation for file which is uploading in JavaScript. I am using a third party tool called "Telerik". In this third party tool we have a lot of features for our convenience. Here i am checking the Uploaded file size limit up to 2MB. When ever the file size get exceeded the limit then we can validate and remove the uploaded file from the list. Check the example in the below link.....
http://yash-maneel.blogspot.in/2012/05/uploading-file-in-rad-upload-and.html


Bind DropDownList from javascript

Generally DropDownList also we can bind from clientside. The step by step procedure i have mentioned here.

 we have to get the data from the database and need to bind to dropdown means we need to get it on "ListView" is the better way. I have used PageMethods to get the data to clientside.

Javascript:
<script type="text/javascript">

        function pageLoad() {
            PageMethods.GetData(CallMethod);
        }

        function CallMethod(result) {
            var ddl = document.getElementById("ddl");
            for (D = 0; D < result.length; D++) {
                opt = new Option(result[D], result[D]);
                ddl.add(opt);
            }
        }

</script>

Here the pageLoad method works just like server side pageload event. In this pageload i have got data and binded to dropdownlist. In CallMethod function "result" indicates the obtained data which we need to bind to dropdown in the form of list.

PageMethods:

[WebMethod(EnableSession=true)]
    public static List<string> GetData()
    {
        List<string> list = new List<string>();
        list.Add("one");
        list.Add("two");
        list.Add("three");
        list.Add("four");
        list.Add("five");
        return list;
    }

By this pageMethod list<string> is returning to javascript function.

You can get the sample code by the attached document.....

Difference between .ToString and “as string” in C#

There is a simple but important difference between these three…
ToString() raise exception when the object is null
So in the case of object.ToString(), if object is null, it raise NullReferenceException.
Convert.ToString() return string.Empty in case of null object
(string) cast assign the object in case of null
So in case of
MyObject o = (string)NullObject;
But when you use o to access any property, it will raise NullReferenceException.

Monday, October 29, 2012

Toggle Display (On / Off)

JavaScript
<script language="javascript" type="text/javascript">

  function TDisplay(elementID) {

  var CurrentElement = document.getElementById(elementID);

  CurrentElement.style.display = (CurrentElement.style.display != 'none') ? 'none' : '';

  return false;

}

</script>

.ASPX Page
<asp:LinkButton ID="LinkButton1" runat="server" OnClientClick="return TDisplay('panel1');">

Toggle Display(On / Off)</asp:LinkButton>

<asp:Panel ID="panel1" runat="server">

    Panel content here!

</asp:Panel>

Pass data from one page to another new popup window

<html xmlns="http://www.w3.org/1999/xhtml">

<head runat="server">

    <title></title>

<script language="javascript" type="text/javascript">

    function PassData() {

        var Qstr = document.getElementById("<%=txtData.ClientID %>").value;

        window.open('Your-Target-Page.aspx?ID=' + Qstr, 'NewWindow', 'width=400,height=300,location=no,menubar=no,resizable=no,scrollbars=no,status=yes,toolbars=no');

        return  false;

}


</script>

</head>

<body>

    <form id="form1" runat="server">

    <div>

<asp:TextBox ID="txtData" runat="server" Text="23"

CssClass="TextBox"></asp:TextBox>

<asp:Button ID="btnRedirect" runat="server" Text="Window Open"

CssClass="Button" OnClientClick="return PassData(); " />

    </div>

    </form>

</body>

Monday, October 15, 2012

Hide Files or Folders Using Command Prompt

For that you need to follow the following instructions

  1. Press windowkey+R: Run command dialog box appears.
  2. Now type "cmd" and hit enter. A command prompt window displays.
  3. Now type "attrib +s +h E:\collegephotos" and hit enter.
  4. The folder "collegephotos" will be hidden (Note: It cannot be viewed by any search options)

    (To view this folder again, use the same command but replace '+' with '-' on both flags 's' and 'h')

Wednesday, September 19, 2012

Introduction to SVN

What you will need to download the Tortoise SVN client application.
Download and install and after a restart (bummer) we are ready to start working!
The Tortoise SVN adds its functionality in the Windows Explorer Context Menu.
Introduction to SVN

Verifying the connection to the SVN Server

Before we start working we will have to Verify the connection to the SVN Server. Right click on any folder in the Windows Explorer and select TortoiseSVN -> Repo-browser
you will be asked for a path to the repository enter : file:///C:/<The location of the repositories>/<The repository name you selected> in my case I will enter :
file:///C:/Repositories/Test/
what you should get is this:
Introduction to SVN
If you got this it means that you can connect to the SVN Server.
If you are trying to connect to a remote server you will have to enter the following when asked for the URL of the repository:
https://<The ip of the Server>/svn/<The Repository Name>
You should get the same results.

Getting the files from the repository

To get the files from the repository we created earlier (in the previous article) we will have to create a new folder, which I presume everyone knows how to do :).
After you have created the folder, right click on it and select the "SVN Checkout…" option from the context menu. You will see the following screen:
SVN Checkout
If you followed all the steps the address of the repository should be already written here. All you have to do is click "OK"
Files Checked Out
This means we have checked out the files successfully and we can start working!
The directory should look like this:
Checked out Directory
The Green V marks mean that nothing has changed inside the directory. Lets add a new file to the trunk (main branch) directory. We will then Right Click on the trunk and select "Commit"
SVN Commit
The SVN Server has detected that you have added a new file and you will have to check the Checkbox next to it in order for it to be inserted to the repository.
Lets try and edit the file and add some text in it. Both the file and the Directory will get a red exclamation mark saying they have been changed:
Folder Changed
File Changed
To send the Changes to the Server you can right click any of them and select "SVN Commit…" from the context menu. Doing it on the Folder will make the Commit recursive to all the files inside it.
That’s it!

Saturday, September 15, 2012

Shortcut to Lock Your Computer


You secure your computer by locking it whenever you're
away from your desk. If you are on a domain, by pressing Ctrl+Alt+Del and then
clicking Lock Computer, you can prevent unauthorized users from gaining access
to your computer. Only you and members of the Administrators group on your
computer can unlock it.


Follow the below steps to accomplish the
task.


1.
Right-click an
open area of your desktop--> point to New--> and then click
Shortcut.


Shortcut to Lock Your Computer

2. In
the Location box, type %windir%\System32\rundll32.exe user32.dll
LockWorkStation


Shortcut to Lock Your Computer

3. Click Next--> in the Name box type a name
for the shortcut such as--> Lock Computer--> and then click
Finish.

Shortcut to Lock Your Computer

Shortcut to Lock Your Computer


How to Change a Printer from Offline to Online.

Once you have added either a USB or networked printer to your PC or Mac computer, you can begin sending documents to print. However, on occasion, a print command will create an error on the printer and take it offline, which will prevent all future jobs from printing. To resolve this issue, you will need to change your printer settings from offline to online.


PC Instructions

1. Open the Start menu and click on the "Printers and Faxes" icon. This will open a window with a list of the printers currently set up on your computer.

2. Double-click on the icon of the printer you want to change to online. A pop-up window detailing all current print jobs will open.


3. Go to Printer in the menu bar of the pop-up window and uncheck "Use Printer Offline." This action will change the printer from offline to online.


Mac Instructions


1. Open System Preferences by clicking on the icon in the Dock.


2. Go to the Print & Fax control panel under the Hardware category.


3. Select the printer you want to take online from the list on the left side of the screen. Then click on the "Open Print Queue" button.


4. Click on the "Resume Printer" button at the top of the queue window to change the printer from offline to online.


The open source ASP.NET CMS

1. DotNetNuke

DotNetNuke
Of all the ASP .NET CMSes out there, DotNetNuke is probably the most well known and popular. One of the reasons for the popularity of this CMS is due to its multiple versions which allow for the flexibility to accommodate a beginning web developer, a small to medium sized business, or even a large enterprise. It has enjoyed a busy development since before 2003 that continues to this day.
For those that don't need much support other than what the open source community can provide, there's the DotNetNuke Community Edition offered under the BSD License. It contains most of the features which comprise the other editions, but the support is left up to the community. The Professional Edition gives you support from the DotNetNuke Corporation along with a few more features, and for a (much) increased price, the Enterprise Edition gives you a few more features along with phone support.
This CMS has been around for a while, so it's very stable and there's a plethora of add-ons in the community, so it's definitely the first stop if you're looking for something that's proven.

2. Orchard

Orchard
Provided under the New BSD License, Orchard CMS is Microsoft's hand in the open source world. The Orchard Project is based on a community, backed by full-time developers from Microsoft, that develop components and scripts that are open tools for developers to create applications, and their primary focus at the time is Orchard CMS. Despite some slow development in the beginning, Orchard has struck a chord with the open source community, and the number of contributors is growing every day.
While some of the things you'd expect in a more robust CMS might be missing, there's several fantastic back-end features which will delight anyone who is looking for a young project to support that has a great prospect of growing in the future.

3. Kentico

Kentico CMS for asp.net
Another CMS offering multiple licensing options is the Kentico CMS. The free license requires you to keep the logo and copyright information on your page, but the commercial versions offer support and allow you to work without the branding. It's designed to be easy to use for even novice users, so web development should go fast with someone who is experienced.
Kentico's focus lies in three areas: Content Management, E-Commerce, and Social Networking. That broad base makes it an excellent choice for a wide variety of technology ventures. If the company's success, showing a three year growth of 553%, is any indication, this is a CMS to keep an eye on.

4. Umbraco

Umbraco
As an open source project, Umbraco isn't going to break your budget, and it has really come alive over the past few years. It was first released in 2004 but it took a little while for it to gain traction. Lately, though, it has become very popular with designers due to the open templating system and ability to build in guidelines that automatically format the content writers provide. Also, it uses ASP .NET “master pages” and XSLT, so you won't have to work with a heaped-together templating format. It's written in C# and is happy to work with a variety of databases, so hosting shouldn't be a problem for you.
In 2009, CMS Wire dubbed Umbraco as one of the best open-source .NET CMS options available. In 2011, it was averaging close to 1000 downloads a day via Codeplex and is highly ranked amongst top downloads via the Microsoft Installer.

5. mojoPortal

mojoPortal
mojoPortal is another open source CMS option based upon the .NET framework. It has a very active developer group and is consistently being updated. While it is free to download and use, there are a number of commercial add-ons that are used to help fund the project. When it comes to developing your own applications, many people prefer mojoPortal because it can act as a starter kit for advanced .NET sites or portals.
mojoPortal is also considered to be very strong as a standalone CMS. It is easy to learn and very simple to use. It includes a variety of different tools such as blogs, photo galleries, chat, newsletters, pools, forums, and much more. It also has a very strong community which makes troubleshooting extremely simple.

6. Sitefinity

Sitefinity
Sitefinity is a commercial .NET content management system with 5 available license editions ranging from free for personal use, to $499 for small businesses up to $19,999 for enterprise use. The license will last for 1 year and during this time, you will get every update and free technical support with paid licenses. Once the year is up, you can still use Sitefinity to run your sites, however you will no longer receive free support or software updates. It is also important to note that the standard license is only good for one domain.
Currently Sitefinity is responsible for powering more than 200 government websites as well as large companies. Some of their most prominent government websites include: The White House Federal Credit Union, United States Courts, Downtown Fort Worth, and the Canadian Securities Transition Office. Additional customers include: Toyota, Vogue, IKEA, Chevron, Bayer, and Coca-Cola. With the price tag as high as it is, you'll want to be sure you're happy with it before you buy it by trying it first, but if the big boys are paying nearly $20,000 a year for it, you know the customer service is going to be top notch.

7. Composite C1

Composite C1
A relative newcomer to the ASP.NET market, Composite C1 was originally sold as a commercial CMS in Northern Europe until September 2010. Now, it's a free and open source CMS in version 3.0 that's offered under the Mozilla Public License. It's focus is for web developers working on corporate websites, so its learning curve is most likely too steep for the neonate. The 3.0 version, released in December 2011, was only downloaded a little over 1000 times from codeplex, but despite it's dark horse status, it continues to be a well designed CMS for the more experienced developer that wants their CMS to be more functional than it is beautiful.
There are enough free community and commercial add-ons for you to plug in the functionality you need quickly, so Composite C1 is worth checking out if you want to get your hands dirty.

Wednesday, September 5, 2012

Some best practices while writing ASP.NET code


Use int.TryParse() to keep away from Exception.

While using Convert.ToInt32(), if the input parameter is of wrong format and if it can not be convertable into integer then an exception of type "System.FormatException" will be thrown, but in case of int.TryParse() no Exception will be thrown.
e.g :-
If we are converting a QueryString value to integer and the QueryString value is "de8913jhjkdas", then -
int employeeID = 0;
employeeAge = Convert.ToInt32(Request.QueryString.Get("id"));//Here it will throw an Exception.
int employeeAge = 0;
int.TryParse(Request.QueryString.Get("id");, out employeeAge);//Here it will not throw any Exception.

You can also use bool.TryParse, float.TryParse,double.TryParse, etc for converting into other datatypes.

-----------------------------------------------------------------------------------------------------------


Convert.ToString() V/S obj.ToString()

Use Convert.ToString(), because if you are using obj.ToString() and the object(obj) value is null it will throw an excetion of type "System.NullReferenceException".

The cause of the exception is null doesn't have a method called ToString().

Response.Write("Name : " +Session["User_Name"].ToString());        //Here it will throw an Exception if Session["User_Name"] is null.

Response.Write("Name : " +Convert.ToString(Session["User_Name"])); //Here it will not throw any Exception.


String.Empty V/S ""

If you want to check whether a string is empty or not then use String.Empty instead of "", because "" will create a new object in the memory for the checking while String.Empty will not create any object, because Empty is a read-only property of String class.


So its better to use if("Devi" == String.Empty) instead of if("Devi" == "").


You can also use if("Devi".Length == 0) for doing the same thing but if the string is null then it will throw an exception of type "System.NullReferenceException".

 String.IsNullorEmpry() V/S ("" || null)

Suppose you want to check a string for both its emptiness and nullability then its better to use String.IsNullOrEmpty() instead of ("" || null). Because "" will create a new object but String.IsNullOrEmpty() will not do so.

So its better to use if(String.IsNullOrEmpty("Devi")) instead of if("Devi" == ""|| "Devi" == null)

Tuesday, July 24, 2012

Sql Query - "0" for Inactive "1' for Active

select *, case status when '1' then 'Active' when '0' then 'In-Active' end as Status1 from tblArticleMasterDestination order by Destname

Dal Class-lIbrary

using System;
using System.Data;
using System.Data.SqlClient;
using System.Collections;
public sealed class DAL
{
private DAL() { }
private static void AttachParameters(SqlCommand command, SqlParameter[] commandParameters)
{
foreach (SqlParameter p in commandParameters)
{
if ((p.Direction == ParameterDirection.InputOutput) && (p.Value == null))
{
p.Value = DBNull.Value;
}
command.Parameters.Add(p);
}
}

private static void AssignParameterValues(SqlParameter[] commandParameters, object[] parameterValues)
{
if ((commandParameters == null) || (parameterValues == null))
{
return;
}
if (commandParameters.Length != parameterValues.Length)
{
throw new ArgumentException("Parameter count does not match Parameter Value count.");
}

for (int i = 0, j = commandParameters.Length; i < j; i++)
{
commandParameters[i].Value = parameterValues[i];
}
}
private static void PrepareCommand(SqlCommand command, SqlConnection connection, SqlTransaction transaction, CommandType commandType, string commandText, SqlParameter[] commandParameters)
{
if (connection.State != ConnectionState.Open)
{
connection.Open();
}
command.Connection = connection;
command.CommandText = commandText;
if (transaction != null)
{
command.Transaction = transaction;
}
command.CommandType = commandType;
if (commandParameters != null)
{
AttachParameters(command, commandParameters);
}
return;
}
public static int ExecuteNonQuery(string connectionString, CommandType commandType, string commandText, params SqlParameter[] commandParameters)
{
using (SqlConnection cn = new SqlConnection(connectionString))
{
cn.Open();
return ExecuteNonQuery(cn, commandType, commandText, commandParameters);
}
}
public static int ExecuteNonQuery(string connectionString, string spName, params object[] parameterValues)
{
if ((parameterValues != null) && (parameterValues.Length > 0))
{
SqlParameter[] commandParameters = SqlHelperParameterCache.GetSpParameterSet(connectionString, spName);
AssignParameterValues(commandParameters, parameterValues);
return ExecuteNonQuery(connectionString, CommandType.StoredProcedure, spName, commandParameters);
}
else
{
return ExecuteNonQuery(connectionString, CommandType.StoredProcedure, spName);
}
}
public static int ExecuteNonQuery(SqlConnection connection, CommandType commandType, string commandText, params SqlParameter[] commandParameters)
{
SqlCommand cmd = new SqlCommand();
PrepareCommand(cmd, connection, (SqlTransaction)null, commandType, commandText, commandParameters);
cmd.CommandTimeout = 120;
int retval = cmd.ExecuteNonQuery();
cmd.Parameters.Clear();
return retval;
}
public static DataSet ExecuteDataset(string connectionString, CommandType commandType, string commandText, params SqlParameter[] commandParameters)
{
using (SqlConnection cn = new SqlConnection(connectionString))
{
cn.Open();
return ExecuteDataset(cn, commandType, commandText, commandParameters);
}
}
public static DataSet ExecuteDataset(string connectionString, string spName, params object[] parameterValues)
{
if ((parameterValues != null) && (parameterValues.Length > 0))
{
SqlParameter[] commandParameters = SqlHelperParameterCache.GetSpParameterSet(connectionString, spName);
AssignParameterValues(commandParameters, parameterValues);
return ExecuteDataset(connectionString, CommandType.StoredProcedure, spName, commandParameters);
}
else
{
return ExecuteDataset(connectionString, CommandType.StoredProcedure, spName);
}
}
public static DataSet ExecuteDataset(SqlConnection connection, CommandType commandType, string commandText, params SqlParameter[] commandParameters)
{
SqlCommand cmd = new SqlCommand();
PrepareCommand(cmd, connection, (SqlTransaction)null, commandType, commandText, commandParameters);
SqlDataAdapter da = new SqlDataAdapter(cmd);
DataSet ds = new DataSet();
cmd.CommandTimeout = 120;
da.Fill(ds);
cmd.Parameters.Clear();
return ds;
}
public static DataTable ExecuteDatatable(string connectionString, CommandType commandType, string commandText, params SqlParameter[] commandParameters)
{
using (SqlConnection cn = new SqlConnection(connectionString))
{
cn.Open();
return ExecuteDatatable(cn, commandType, commandText, commandParameters);
}
}
public static DataTable ExecuteDatatable(string connectionString, string spName, params object[] parameterValues)
{
if ((parameterValues != null) && (parameterValues.Length > 0))
{
SqlParameter[] commandParameters = SqlHelperParameterCache.GetSpParameterSet(connectionString, spName);
AssignParameterValues(commandParameters, parameterValues);
return ExecuteDatatable(connectionString, CommandType.StoredProcedure, spName, commandParameters);
}
else
{
return ExecuteDatatable(connectionString, CommandType.StoredProcedure, spName);
}
}
public static DataTable ExecuteDatatable(SqlConnection connection, CommandType commandType, string commandText, params SqlParameter[] commandParameters)
{
SqlCommand cmd = new SqlCommand();
PrepareCommand(cmd, connection, (SqlTransaction)null, commandType, commandText, commandParameters);
SqlDataAdapter da = new SqlDataAdapter(cmd);
DataTable dt = new DataTable();
da.Fill(dt);
cmd.Parameters.Clear();
return dt;
}
public static object ExecuteScalar(string connectionString, CommandType commandType, string commandText, params SqlParameter[] commandParameters)
{
using (SqlConnection cn = new SqlConnection(connectionString))
{
cn.Open();
return ExecuteScalar(cn, commandType, commandText, commandParameters);
}
}
public static object ExecuteScalar(string connectionString, string spName, params object[] parameterValues)
{
if ((parameterValues != null) && (parameterValues.Length > 0))
{
SqlParameter[] commandParameters = SqlHelperParameterCache.GetSpParameterSet(connectionString, spName);
AssignParameterValues(commandParameters, parameterValues);
return ExecuteScalar(connectionString, CommandType.StoredProcedure, spName, commandParameters);
}
else
{
return ExecuteScalar(connectionString, CommandType.StoredProcedure, spName);
}
}
public static object ExecuteScalar(SqlConnection connection, CommandType commandType, string commandText, params SqlParameter[] commandParameters)
{
SqlCommand cmd = new SqlCommand();
PrepareCommand(cmd, connection, (SqlTransaction)null, commandType, commandText, commandParameters);
cmd.CommandTimeout = 120;
object retval = cmd.ExecuteScalar();
cmd.Parameters.Clear();
return retval;
}
}
public sealed class SqlHelperParameterCache
{
private SqlHelperParameterCache() { }
private static Hashtable paramCache = Hashtable.Synchronized(new Hashtable());
private static SqlParameter[] DiscoverSpParameterSet(string connectionString, string spName, bool includeReturnValueParameter)
{
using (SqlConnection cn = new SqlConnection(connectionString))
using (SqlCommand cmd = new SqlCommand(spName, cn))
{
cn.Open();
cmd.CommandType = CommandType.StoredProcedure;
SqlCommandBuilder.DeriveParameters(cmd);

if (!includeReturnValueParameter)
{
cmd.Parameters.RemoveAt(0);
}

SqlParameter[] discoveredParameters = new
SqlParameter[cmd.Parameters.Count];
cmd.Parameters.CopyTo(discoveredParameters, 0);
return discoveredParameters;
}
}
private static SqlParameter[] CloneParameters(SqlParameter[] originalParameters)
{
SqlParameter[] clonedParameters = new SqlParameter[originalParameters.Length];
for (int i = 0, j = originalParameters.Length; i < j; i++)
{
clonedParameters[i] = (SqlParameter)
((ICloneable)originalParameters[i]).Clone();
}
return clonedParameters;
}
public static void CacheParameterSet(string connectionString, string commandText, params SqlParameter[] commandParameters)
{
string hashKey = connectionString + ":" + commandText;
paramCache[hashKey] = commandParameters;
}
public static SqlParameter[] GetCachedParameterSet(string connectionString, string commandText)
{
string hashKey = connectionString + ":" + commandText;
SqlParameter[] cachedParameters = (SqlParameter[])paramCache[hashKey];
if (cachedParameters == null)
{
return null;
}
else
{
return CloneParameters(cachedParameters);
}
}
public static SqlParameter[] GetSpParameterSet(string connectionString, string spName)
{
return GetSpParameterSet(connectionString, spName, false);
}
public static SqlParameter[] GetSpParameterSet(string connectionString, string spName, bool includeReturnValueParameter)
{
string hashKey = connectionString + ":" + spName + (includeReturnValueParameter ? ":include ReturnValue Parameter" : "");
SqlParameter[] cachedParameters;
cachedParameters = (SqlParameter[])paramCache[hashKey];
if (cachedParameters == null)
{
cachedParameters = (SqlParameter[])(paramCache[hashKey] = DiscoverSpParameterSet(connectionString, spName, includeReturnValueParameter));
}
return CloneParameters(cachedParameters);
}
}

Active/Inactive

In Gridview Define templatefield inside column

<asp:GridView ID="gvContent" runat="server" CssClass="body-text-black" Width="750px" AllowPaging="True" AutoGenerateColumns="False" HeaderStyle-CssClass="gridhead" CellPadding="5" RowStyle-CssClass="gridrow1" AlternatingRowStyle-CssClass="gridrow2" BorderWidth="0px" GridLines="None" HeaderStyle-VerticalAlign="top" HorizontalAlign="Left" HeaderStyle-HorizontalAlign="left" RowStyle-VerticalAlign="top" onpageindexchanging="gvContent_PageIndexChanging" onrowcommand="gvContent_RowCommand" PageSize=30 onrowdatabound="gvContent_RowDataBound">
 <Columns>

<asp:TemplateField HeaderText="S.No.">
 <ItemTemplate>
<%# Container.DataItemIndex + 1 %> </ItemTemplate>
 </asp:TemplateField>

<asp:templatefield headertext="Active/InActive">
 <itemtemplate>
<asp:button causesvalidation="false" commandargument="<%#Eval("DestID")%>" commandname="Status" cssclass="btn" id="btnStatus" onclientclick="return
ConfirmStatus()" runat="server" text="<%#Eval("Status1")%>"> </asp:button>
</itemtemplate>

</asp:templatefield>
</Columns>

</asp:GridView>
I have used command name and command arguement and it will handle inside rowcommand event.

Row command Code of Cs page

protected void gvContent_RowCommand(object sender, GridViewCommandEventArgs e)
{
 if (e.CommandName == "Status")
{
 int index = Convert.ToInt32(e.CommandArgument.ToString());
 try
{
 int iRow = DAL.ExecuteNonQuery(ConnectionString, "prcDesttemp", "4", index, "","", "", "", "","", "","","","","", "1", "0" ,0, 0 ,0,"0"); Fillgridview(); lblMsg.Text = "Status Changed Successfully.";
 }
 catch (Exception ex)
 { }
 }
 }
I have used pocedure to do this task -which is easy to maintain.And used a Dal Class for this where i am passing connection string , procedure name, action Id and parameter.


CREATE procedure [dbo].[prcDesttemp]
(
@ActionId tinyint,
@DestID int,
@DestName nvarchar(100),
@DestiShortDesc nvarchar (200),
@DestiLongDesc text,
@PlaceDesc text,
@WeatherDesc text,
@HistoryDesc text,
@VisitDesc text,
@SmallImage nvarchar(200),
@LongImage nvarchar(200),
@MetaTitle text,
@MetaDesc text, @Status tinyint ,
@Result tinyint output,
@RegionID int,
@CountryID int,
@CityID int ,
@Displayonhome tinyint
)
--sp_help tblArticleMasterClient
as
begin
set nocount on
if @ActionId=1 --Add Destination
begin
insert into tblArticleMasterDestination (DestName,DestiShortDesc,DestiLongDesc,PlaceDesc,WeatherDesc, HistoryDesc, VisitDesc,SmallImage,LongImage,MetaTitle,MetaDesc,Status,CreateDate , RegionID , CountryID , CityID,Displayonhome ) values (@DestName, @DestiShortDesc, @DestiLongDesc,@PlaceDesc, @WeatherDesc, @HistoryDesc, @VisitDesc, @SmallImage , @LongImage , @MetaTitle, @MetaDesc, '1', getdate() , @RegionID , @CountryID , @CityID,@Displayonhome)
end
if @ActionId=2 --Update Destination
begin
update tblArticleMasterDestination set
DestName = @DestName,
DestiShortDesc = @DestiShortDesc ,
DestiLongDesc = @DestiLongDesc ,
PlaceDesc = @PlaceDesc ,
WeatherDesc=@WeatherDesc,
HistoryDesc=@HistoryDesc,
VisitDesc=@VisitDesc,
SmallImage=@SmallImage,
LongImage=@LongImage,
MetaTitle=@MetaTitle,
MetaDesc=@MetaDesc,
UpdateDate = getdate()
, RegionID = @RegionID ,
CountryID = @CountryID ,
CityID = @CityID
where DestID = @DestID
end
if @ActionId=3 --Select records
begin
select *, case status when '1' then 'Active' when '0' then 'In-Active' end as Status1 from tblArticleMasterDestination order by Destname end
if @ActionId=4 --Change Status
begin
select @Status=Status from tblArticleMasterDestination where DestID=@DestID
if @Status=0 --InActive
begin
Update tblArticleMasterDestination set Status=1 where DestID=@DestID end
else --Active
begin
update tblArticleMasterDestination set Status=0 where DestID=@DestID end
end
end --set nocount off end


Get Dal class And copy it and put this in app_code library

Monday, July 23, 2012

Database Normalization Basics

Normalization or data normalization is a process to organize the data into tabular format (database tables). A good database design includes the normalization, without normalization a database system may slow, inefficient and might not produce the expected result. Normalization reduces the data redundancy and inconsistent data dependency.

Normal Forms

We organize the data into database tables by using normal forms rules or conditions. Normal forms help us to make a good database design. Generally we organize the data up to third normal form. We rarely use the fourth and fifth normal form.
To understand normal forms consider the folowing unnormalized database table. Now we will normalize the data of below table using normal forms.

  1. First Normal Form (1NF)

    A database table is said to be in 1NF if it contains no repeating fields/columns. The process of converting the UNF table into 1NF is as follows:
    1. Separate the repeating fields into new database tables along with the key from unnormalized database table.
    2. The primary key of new database tables may be a composite key
    1NF of above UNF table is as follows:
    Database Normalization Basics
  2. Second Normal Form (2NF)

    A database table is said to be in 2NF if it is in 1NF and contains only those fields/columns that are functionally dependent(means the value of field is determined by the value of another field(s)) on the primary key. In 2NF we remove the partial dependencies of any non-key field.
    The process of converting the database table into 2NF is as follows:
    1. Remove the partial dependencies(A type of functional dependency where a field is only functionally dependent on the part of primary key) of any non-key field.
    2. If field B depends on field A and vice versa. Also for a given value of B, we have only one possible value of A and vice versa, Then we put the field B in to new database table where B will be primary key and also marked as foreign key in parent table.
    2NF of above 1NF tables is as follows:
    Database Normalization Basics
  3. Third Normal Form (3NF)

    A database table is said to be in 3NF if it is in 2NF and all non keys fields should be dependent on primary key or We can also said a table to be in 3NF if it is in 2NF and no fields of the table is transitively functionally dependent on the primary key.The process of converting the table into 3NF is as follows:
    1. Remove the transitive dependecies(A type of functional dependency where a field is functionally dependent on the Field that is not the primary key.Hence its value is determined, indirectly by the primary key )
    2. Make separate table for transitive dependent Field.
    3NF of above 2NF tables is as follows:
    Database Normalization Basics
  4. Boyce Code Normal Form (BCNF)

    A database table is said to be in BCNF if it is in 3NF and contains each and every determinant as a candidate key.The process of converting the table into BCNF is as follows:
    1. Remove the non trival functional dependency.
    2. Make separate table for the determinants.
    BCNF of below table is as follows:
    Database Normalization Basics
  5. Fourth Normal Form (4NF)

    A database table is said to be in 4NF if it is in BCNF and primary key has one-to-one relationship to all non keys fields or We can also said a table to be in 4NF if it is in BCNF and contains no multi-valued dependencies.The process of converting the table into 4NF is as follows:
    1. Remove the multivalued dependency.
    2. Make separate table for multivalued Fields.
    4NF of below table is as follows:
    Database Normalization Basics
  6. Fifth Normal Form (5NF)

    A database table is said to be in 5NF if it is in 4NF and contains no redundant values or We can also said a table to be in 5NF if it is in 4NF and contains no join dependencies.The process of converting the table into 5NF is as follows:
    1. Remove the join dependency.
    2. Break the database table into smaller and smaller tables to remove all data redundancy.
    5NF of below table is as follows:
    Database Normalization Basics
Summary
In this article I try to explain the Normalization with example. I hope after reading this article you will be able to understand Normal Forms. I would like to have feedback from my blog readers. Please post your feedback, question, or comments about this article.

Introduction to SVN

SVN is an open source version control system that is broadly used by many organizations for its project history. It is free to use and manage source code different versions. You can find below two types of svn.
Ankh SVN is a open source subversion Source control for Visual Studio for managing your's code different versions like VSS and TFS.
Tortoise SVN is also a open source subversion Source control for managing your's source code versions. Your source code could be in any language and could support window or unix or apache platform
It has the following listed features:-
  1. SVN tracks the structure of all folders present in your project.
  2. It assigns a global revision number to your source code repository that is used to manage your source code history.
  3. SVN commits and updates are atomic.
  4. SVN maintains the revision history of moved or copied files.
  5. SVN can be installed on Window, Unix and Apache platform.
  6. SVN Client and SVN Server are used to manage source code versions. SVN Server version is installed on Server and SVN Client version is installed on Client side.
You can go to this link for installing and managing Ankh SVN on your computer.
You can go to this link for installing and managing Tortoise SVN on your computer.

Example to get file size before upload using JQuery

Example to get file size before upload using JQuery

 <html xmlns="http://www.w3.org/1999/xhtml">

<head>

 <title>Get File Size</title> 

 <script src="Scripts/jquery-1.7.1.min.js" type="text/javascript" > </script>

 <script type="text/javascript">

 function GetFileSize(fileid) {

 try {

 var fileSize = 0;

 //for IE

 if ($.browser.msie) {

 //before making an object of ActiveXObject, 

 //please make sure ActiveX is enabled in your IE browser

 var objFSO = new ActiveXObject("Scripting.FileSystemObject"); var filePath = $("#" + fileid)[0].value;

 var objFile = objFSO.getFile(filePath);

 var fileSize = objFile.size; //size in kb

 fileSize = fileSize / 1048576; //size in mb 

 }

 //for FF, Safari, Opeara and Others

 else {

 fileSize = $("#" + fileid)[0].files[0].size //size in kb

 fileSize = fileSize / 1048576; //size in mb 

 }

 alert("Uploaded File Size is" + fileSize + "MB");

 }

 catch (e) {

 alert("Error is :" + e);

 }

}

 </script>

</head>

<body>

<form name="upload" action="">

<input type="file" name="fUpload" id="fUpload" />

<input type="button" value="Get File Size" onclick="GetFileSize('fUpload');" />

</form>

</body>

</html> 

Example to get file size before upload in Asp.Net using JQuery

Using above defined function "GetFileSize", we can also get file size in Asp.net also like as :
 <form id="form1" runat="server"> 

<asp:FileUpload ID="fUpload" runat="server" />

 <asp:Button ID="btnGetSize" runat="server" Text="Button" OnClientClick="GetFileSize('fUpload');" /> 

</form> 

Wednesday, July 18, 2012

What is IT ? IT is JUGAAD.

I am always a student and I enjoy being Student. I want to learn almost everything about Computer Science that exists. So I keep trying at home, office, even while I sleep. Since two yr of job My senior is a Web developer . He is one of the Extremely talented Developers I have ever met. IT is short form of Information Technology and Related to Computer and Digital world. Everything inside Digital world can be taken inside IT. According to him what i understand most is that IT is jugaad (Trick/hacks) to solve the different problem by different ways.

How to Access My Windows 7 Laptop without Admin Password

It's a good habit to set a password on your computer so that people can not enter windows without knowing your password. But if you forgot Windows 7 password, you'll also be prevented from logging in. How to reset Windows 7 password if you forgot Windows password and can't log on using any administrator account?
In this article I'll cover the most two popular and efficient Windows 7 password recovery programs for you to reset Windows 7 login password, even if you can't get into Windows system. Let's know how can we achieve it.
1. Ophcrack
The Ophcrack is a free Windows password cracker based on rainbow tables. It is a very efficient implementation of rainbow tables done by the inventors of the method. It comes with a Graphical User Interface and runs on multiple platforms. By far, it is the most popular free way for password recovery on Windows 7.
With Ophcrack, you don't need any access to Windows system to be able to recover your lost passwords. Simply visit the site, download the free ISO image, burn it to a CD and boot from the CD. The Ophcrack program starts, locates the Windows user accounts, and proceeds to recover (crack) the passwords.
Before trying it, the following 2 things you should learn about the free Windows password hack:
1. 496MB (7/Vista) / 415MB (XP) LiveCD ISO image will take you much time for download.
2. Passwords greater than 14 characters cannot be cracked.
If this free Windows password cracker doesn't work for you, a good alternative option is to get Windows Password Unlocker.
2. Window Password Unlocker
Windows Password Unlocker is a professional Windows password reset tool. When Windows forgot password, this powerful utility allows you to remove the forgotten password by burning a bootable password reset USB, instead of recovering it.
Requirements:
1. A blank CD/DVD and CD-ROM¡Ã€RW drive are required
2. Download and install this software in a Windows PC rather than a Mac.
Steps:
1. Download and install Windows Password Unlocker
2. Burn a password reset disk with a bootable CD/DVD
3. Reset Windows password with created CD/DVD reset disk
After the password reset success, you can access your computer without entering a password. The whole password reset process is in 5 minutes, and has no damage to your computer. Windows Password Unlocker enjoys great popularity among forgotten Windows password users. Through this powerful application, you can easily reset a forgotten laptop administrator password in 5 minutes instead of recovering it in hours by Ophcrack.

Friday, July 13, 2012

Url Rewritting in 2.0

 urlMappings redirect URLs to new locations. This element is part of an ASP.NET config file. It quickly redirects Googlebot and users alike to the new locations. It is easily added to Web.config to perform this complex task.


Now in the web config file you can put below code in between <system.web> and</system.web>


<urlMappings enabled="true" >
 <!--url which you want mappedURL = transfered url location -->
 <add mappedUrl="~/Detail.aspx?id=1" url="~/one.aspx"/>
 <add mappedUrl="~/Detail.aspx?id=2" url="~/two.aspx"/>
  <add mappedUrl="~/Detail.aspx?id=3" url="~/three.aspx"/>
  <add mappedUrl="~/Detail.aspx?id=4" url="~/four.aspx"/>
  </urlMappings>


mappedurl=  mapping applied on this url


Url=which is not available but stilll you made it to appear.

Tuesday, July 3, 2012

Virtual keywords use in C#


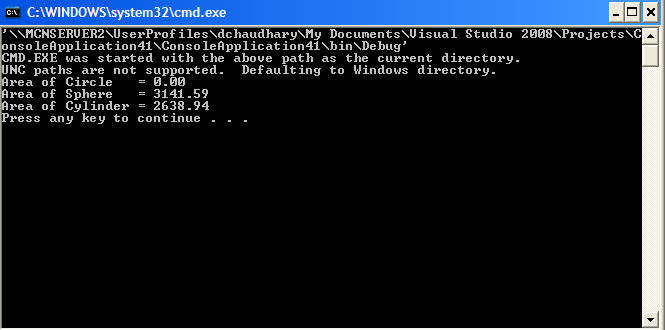
Introduction:A virtual keyword is used to modify a method property  event declaration and allow to be overridden in a derived class. in this program the class dimensions contain the two coordinates a,b and the area()virtual method.diffrent shape class such as circle cylinder and sphere inherit the dimensions class and the surface area is calculated for each figure.
Example:using System;
using System.Collections.Generic;
using System.Linq;
using System.Text;
class TestClass
{
    public class Dimensions
    {
        public const double PI = Math.PI;
        protected double a, b;
        public Dimensions()

        {
        }
         public Dimensions(double a, double b)
        {
            this.a = a;
            this.b = b;
        }

        public virtual double Area()
        {
            return a*b;
        }
    }
    public class Circle : Dimensions
    {
        public Circle(double r)
            : base(r, 0)
        {
        }

        public override double Area()
        {
            return PI * a * b;
        }
    }

    class Sphere : Dimensions
    {
        public Sphere(double r)
            : base(r, 0)
        {
        }

        public override double Area()
        {
            return 100 * PI * a * a;
        }
    }

    class Cylinder : Dimension

    {
        public Cylinder(double r, double h)
            : base(r, h)
        {
        }

        public override double Area()
        {
            return 2 * PI * a * a + 8 * PI * a * b;
        }
    }

    static void Main()
    {
        double r = 10.0, h = 8.0;
        Dimensions c = new Circle(r);
        Dimensions s = new Sphere(r);
        Dimensions l = new Cylinder(r, h);
       
        Console.WriteLine("Area of Circle   = {0:F2}", c.Area());
        Console.WriteLine("Area of Sphere   = {0:F2}", s.Area());
        Console.WriteLine("Area of Cylinder = {0:F2}", 1.Area());
    }
}
Output:
Virtual keywords use in C#

How to Hack Windows Administrator Password

Here is another simple way through which you can reset the password of any non-administrator accounts. The only requirement for this is that you need to have administrator privileges. Here is a step-by-step instruction to accomplish this task.
1. Open the command prompt (Start->Run->type cmd->Enter)
2. Now type net user and hit Enter
3. Now the system will show you a list of user accounts on the computer. Say for example you need to reset the password of the account by name John, then do as follows
4. Type net user John * and hit Enter. Now the system will ask you to enter the new password for the account. That’s it. Now you’ve successfully reset the password for John without knowing his old password.
So in this way you can reset the password of any Windows account at times when you forget it so that you need not re-install your OS for any reason. I hope this helps.

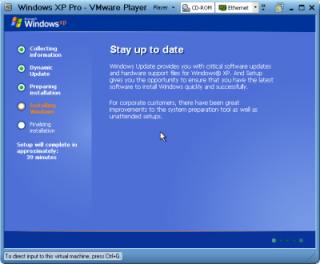
Install windows xp in less than 15 minutes

Install windows xp in less than 15 minutes
  1. Boot through windows xp cd
  2. After all the files are completely loaded,you get the option to select the partition. Select “c:”
  3. Now format the partition,whether it is normal or quick with NTFS or FAT
  4. Once the formatting is completed, All the setup files required for installation are copied. Restart your system by pressing Enter.
  5. Now here begins the simple trick to save 15 minutes.
  6. After rebooting , you get a screen where it takes 40 minutes to complete or finalize OS installation
  7. now press Shift + F10 Key. This opens command Prompt.
  8. Enter “taskmgr” at the command prompt window. This will open task manager
  9. Click the process Tab, here we find a process called Setup.exe . Right click on Setup.exe-> Set priority – > Select High or Above normal. Initially it will be Normal

Wednesday, June 20, 2012

Maximum 255 character textbox counter set

<html>
<head>
  <link rel="canonical" href="http://www.example.com" />
<script language = "Javascript">
/**
 * DHTML textbox character counter script. Courtesy of SmartWebby.com (http://www.smartwebby.com/dhtml/)
 */

maxL=255;
var bName = navigator.appName;
function taLimit(taObj) {
    if (taObj.value.length==maxL) return false;
    return true;
}

function taCount(taObj,Cnt) {
    objCnt=createObject(Cnt);
    objVal=taObj.value;
    if (objVal.length>maxL) objVal=objVal.substring(0,maxL);
    if (objCnt) {
        if(bName == "Netscape"){   
            objCnt.textContent=maxL-objVal.length;}
        else{objCnt.innerText=maxL-objVal.length;}
    }
    return true;
}
function createObject(objId) {
    if (document.getElementById) return document.getElementById(objId);
    else if (document.layers) return eval("document." + objId);
    else if (document.all) return eval("document.all." + objId);
    else return eval("document." + objId);
}
</script>

<body>

<fb:like ref="top_left"></fb:like>
<iframe src="http://www.facebook.com/l.php?fb_ref=top_left&fb_source=profile_oneline"></iframe>


<div id="content">
  <g:plusone size="small"></g:plusone>

    <script type="text/javascript">
      window.___gcfg = {
        lang: 'en-US'
      };

      (function() {
        var po = document.createElement('script'); po.type = 'text/javascript'; po.async = true;
        po.src = 'https://apis.google.com/js/plusone.js';
        var s = document.getElementsByTagName('script')[0]; s.parentNode.insertBefore(po, s);
      })();
    </script>


<font> Maximum Number of characters for this text box is 255.<br>
<textarea onKeyPress="return taLimit(this)" onKeyUp="return taCount(this,'myCounter')" name="Description" rows=7 wrap="physical" cols=40 Maxlength="255">
</textarea>
<br><br>
You have <B><SPAN id=myCounter>255</SPAN></B> characters remaining
for your description...</font>
</body>

</html>


Remove duplicates from a datatable..

using System.Data;

using System.Linq;

DataTable dt = ds.Tables[0];

DataView dv = new DataView(dt);

string cols = string.Empty;

foreach (DataColumn col in dt.Columns)

{

if (!string.IsNullOrEmpty(cols)) cols += ",";

cols += col.ColumnName;

}

dt = dv.ToTable(true, cols.Split(','));

ds.Tables.RemoveAt(0);

ds.Tables.Add(dt);

To select time format in hh:mm (AM/PM) format


SELECT REPLACE(REPLACE(RIGHT('0'+LTRIM(RIGHT(CONVERT(varchar,getdate(),100),8)),7),'PM',' PM'),'AM',' AM')

Thursday, May 31, 2012

Check Exist or not

 String qryChkExist = "SELECT isnull(column_name,'') as Article_alias from Table_Name where column_name='" + txtalias.text.tostring().trim()+ "'";

 String ChkRecord = (String)SqlHelper.ExecuteScalar(ConnectionString, CommandType.Text, qryChkExist);
        if (ChkRecord != null)
        {
            if (ChkRecord != "")
            {
                lblMsg.Text = "Another Alias with this Name already exists. Please choose another Alias.";
                return;
            }
        }

Monday, May 21, 2012

Limitation Login

Step 1:Use NameSpaces As

using System.Data.SqlClient;


Step 2: Global Declaration Are:

SqlConnection con = new SqlConnection("Ur Connection");


Step 3:Page_Load

protected void Page_Load(object sender, EventArgs e)
{

if (!Page.IsPostBack)
{
this.ViewState["count"] = 0;
}


}

Step 4:write a Method

public void m()
{
string user = "";
string pass = "";
string str = "select * from tbl_Login where username='" + TextBox1.Text + "' and password='" + TextBox2.Text + "'";
//string count = "";
con.Open();
SqlCommand cmd = new SqlCommand(str, con);
cmd.CommandType = CommandType.Text;
SqlDataReader dr;
dr = cmd.ExecuteReader();
while (dr.Read() == true)
{
user = dr[1].ToString();
pass = dr[2].ToString();


}


dr.Close();
if (TextBox1.Text == user && TextBox2.Text == pass)
{
Response.Redirect("Default2.aspx");
}
else
{
Label1.Text = "Login Failed";
}
con.Close();


Step 5: On Button Click

protected void Button1_Click(object sender, EventArgs e)
{
int i = Convert.ToInt32 (this.ViewState["count"].ToString())+1;
//int i = this.ViewState["count"] + 1;

this.ViewState["count"]=i;
if (i <=3)
{


m();


}
else
{
Label1.Text = "Please Contact Admin.. YOuR Login Limit Exceed";
}
}

except keyword in sql server

CREATE TABLE EMP  (ID INTEGER NOT NULL,NAME VARCHAR(20) NOT NULL, CITY   VARCHAR(20) NULL)                    
                       

insert into EMP values(1,  'EMP1', 'DELHI')
insert into EMP values(2,  'EMP2', 'CHENNAI')
insert into EMP values(3,  'EMP3', 'PUNE')
insert into EMP values(4,  'EMP4', 'AGRA')
insert into EMP values(5,  'EMP5', 'CHENNAI')

CREATE TABLE CITY(ID INT IDENTITY, CITY_NAME VARCHAR(20))

insert into CITY values('CHENNAI')
SELECT CITY FROM EMP EXCEPT SELECT CITY_NAME FROM CITY

Tuesday, May 1, 2012

insert record in two table

create table Person

(

p_id int IDENTITY(1,1) not null primary key,

Fname varchar(50),

Lname varchar(50),

address varchar(50)

)

go


create table orders

(

o_id int IDENTITY(1,1) not null primary key,

oname varchar(50),

Qty int,

p_id int foreign key references Person(p_id),

prize Int

)

go


Create Proc Usp_Orders_Insert

(

@Param_Fname Varchar(50),

@Param_Lname Varchar(50),

@Param_Address Varchar(50),

@Param_oname Varchar(50),

@Param_Qty  Int,

@Param_prize Int

)

As

Begin

 Set Nocount On


 Declare @PersonID Int


 Begin Try

  Begin Tran 


  Insert Person(Fname, Lname, [address]) Values(@Param_Fname, @Param_Lname, @Param_Address)

  Select @PersonID = @@Identity 


  Insert orders(oname, Qty, p_id, prize) Values(@Param_oname, @Param_Qty, @PersonID, @Param_prize)


  Commit


 End Try

 Begin Catch

  Declare @Message Varchar(Max)

  Select @Message = 'Error : ' + ERROR_MESSAGE() + CHAR(10) + 'Line No: '+ Cast(ERROR_LINE() as Varchar(10))

  Raiserror(@Message,16,1)

  Rollback  

 End Catch

End

Go

Wednesday, April 11, 2012

Configuring Apache for ASP.NET

ASP.NET hosting with Apache

The mod_mono Apache module is used to run ASP.NET applications within the Apache web server.
The mod_mono module runs within an Apache process and passes all the requests to ASP.NET applications to an external Mono process that actually hosts your ASP.NET applications. The external ASP.NET host is called "mod-mono-server" and is part of the XSP module.
To use this, you must download and install the mod_mono and xsp components of Mono. mod_mono contains the actual Apache module, and xsp contains the actual ASP.NET hosting engine, both are available from our download page.
See the mod_mono page for details on installation and configuration.